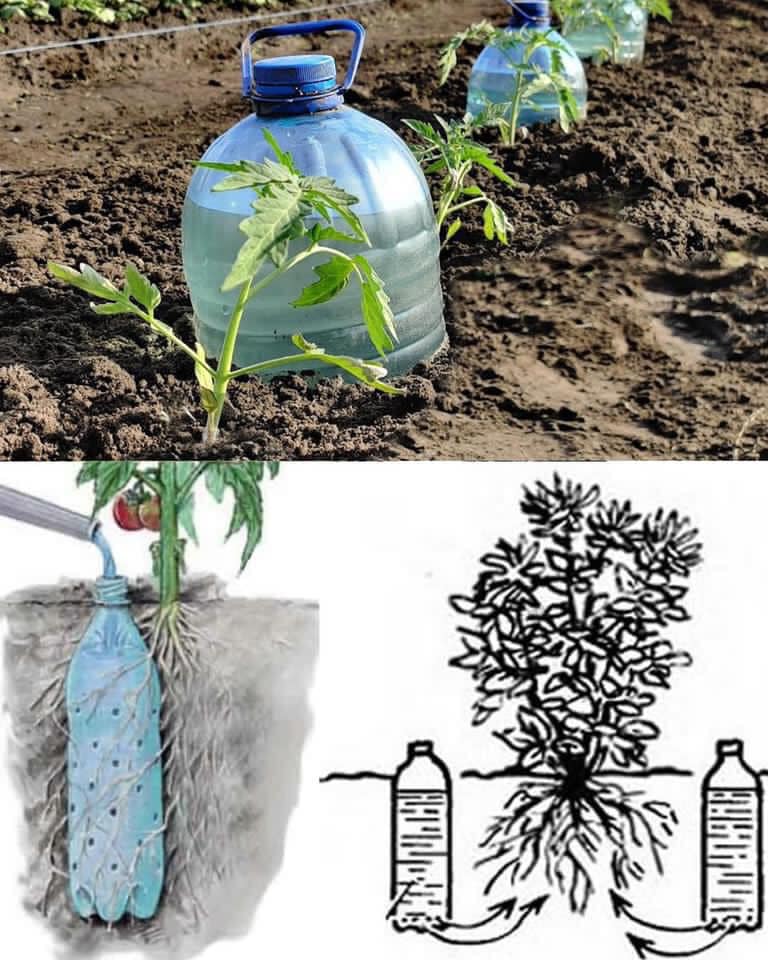
In the hot summer months, it’s important that we keep ourselves and our plants well-hydrated. In the heat and sun, our bodies perspire to cool us down, and plants transpire in the midday heat too. Just as we rely on our water bottles throughout the day, plants can benefit from a slow release watering system as well. While you can go out and purchase some fancy irrigation systems, you can also recycle some of your own water bottles by making a plastic bottle irrigator. Continue reading to learn how to make a soda bottle drip feeder.
DIY Slow Release Watering
Slow release watering directly at the root zone helps a plant develop deep, vigorous roots, while replenishing the moisture aerial plant tissues lost to transpiration. It can also prevent many diseases that spread in the splashes of water. Crafty gardeners are always coming up with new ways to make DIY slow release watering systems. Whether made with PVC pipes, a five-gallon bucket, milk jugs, or soda bottles, the concept is pretty much the same.
Through a series of small holes, water is slowly released to a plant’s roots from a water reservoir of some sort. Soda bottle irrigation allows you to repurpose all your used soda or other beverage bottles, saving space in the recycling bin. When making a slow release soda bottle irrigation system, it is recommended that you use BPA-free bottles for edibles, such as vegetable and herb plants. For ornamentals, any bottle can be used. Be sure to thoroughly wash out the bottles before using them, as the sugars in soda and other beverages can attract unwanted pests to the garden.
Making a Plastic Bottle Irrigator for Plants
Making a plastic bottle irrigator is a pretty simple project. All you need is a plastic bottle, something to make small holes (such as a nail, ice pick, or small drill), and a sock or nylon (optional). You can use a 2-liter or 20-ounce soda bottle. The smaller bottles work better for container plants.
Punch 10-15 small holes all over the bottom half of the plastic bottle, including the bottom of the bottle. You can then place the plastic bottle in the sock or nylon. This prevents soil and roots from getting into the bottle and clogging up the holes. The soda bottle irrigator is then planted in the garden or in a pot with its neck and lid opening above the soil level, next to a newly installed plant. Thoroughly water the soil around the plant, then fill the plastic bottle irrigator with water.
Some people find it is easiest to use a funnel to fill plastic bottle irrigators. The plastic bottle cap can be used to regulate the flow from the soda bottle irrigator. The tighter the cap is screwed on, the slower the water will seep out of the holes. To increase flow, partially unscrew the cap or remove it altogether. The cap also helps prevent mosquitoes from breeding in the plastic bottle and keeps the soil out.
